How to build dev.to In-App Notification System in 20 minutes
In this guide, you'll learn how to build a dev.to In-App Notification Center in 20 minutes.


dev.to is a very popular community for developers. It’s a platform for thousands of developers to collaborate, learn, publish and explore new ways of making programming languages and technology work for them.
I’m an avid reader of dev.to and publish a lot of articles on the platform. My favorite thing to do is to check my notifications to see who posted a new article, commented or liked any of my posts.

I’ll guide you on how to swiftly build an In-App Notification system for your next app using Novu and the dev.to API. While it might not exactly resemble the system mentioned above, it’ll have many similarities.
If you want to explore the code right away, you can view the completed code on GitHub.
Grab your dev.to API key
You can get your dev.to API key from your settings page.

Set up a Next.js app
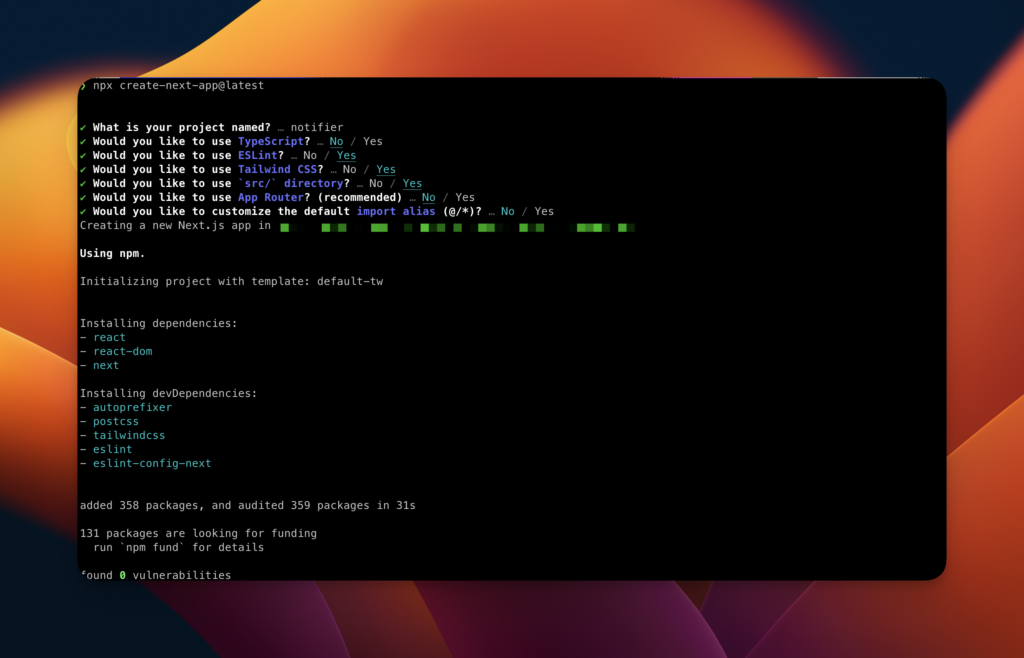
To create a Next.js app, open your terminal, cd into the directory you’d like to create the app in, and run the following command:
1npx create-next-app@latest devtoGo through the prompts, select your preference, install and run the app in your browser with:
1npm run devSet up and integrate Novu
Run the following command to install the Novu node SDK:
1npm install @novu/nodeRun the following command to install the Novu Notification Center package:
1npm install @novu/notification-centerThe Novu Notification Center package provides a React component library that adds a notification center to your React app. The package is also available for non-React apps.
Before we can start sending and receiving notifications, we need to set up a few things:
- Create a workflow for sending notifications,
- Create a subscriber – recipient of notifications.
Create a Novu Workflow
A workflow is a blueprint for notifications. It includes the following:
- Workflow name and Identifier
- Channels: – Email, SMS, Chat, In-App and Push
Create a workflow by following the steps below:
- Click Workflow on the left sidebar of your Novu dashboard.
- Click the Add a Workflow button on the top left. You can select a Blank workflow or use one of the existing templates.
- The name of the new workflow is currently “Untitled”. Rename it to
Devto Notifications. - Select In-App as the channel you want to add.

5. Click on the recently added “In-App” channel and add the following text to it. Once you’re done, click “Update” to save your configuration.

Enable the “Add an Avatar” button to allow the notifications coming in show a default avatar.
Create a Subscriber to receive notifications
A subscriber is the recipient of a notification. Essentially, your app users are subscribers. As a logged-in user on dev.to, you are a subscriber.
To send notifications to a user on your app, you’ll need to register that user as a subscriber on Novu. If you click “Subscriber” on the left sidebar of the Novu Dashboard, you’ll see the subscriber list. As a first time Novu user, it will be an empty list.

Open your terminal and run the following script to create a subscriber:
1curl --location '<https://api.novu.co/v1/subscribers>' \\
2  --header 'Content-Type: application/json' \\
3  --header 'Accept: application/json' \\
4  --header 'Authorization: ApiKey <NOVU_API_KEY>' \\
5  --data-raw '{
6    "firstName": "John",
7    "lastName": "Doe",
8    "email": "johndoe@domain.com",
9    "phone": "+1234567890"
10    }'
Note: Grab your NOVU API Key from the settings section of your Novu dashboard.
Refresh the Subscribers page on your Novu dashboard. You should see the recently added subscriber now! You can also add a subscriber to Novu by running this API endpoint.
Note: The best option to add a subscriber is via code in your backend. With Node.js code, you can run the following code to create a subscriber:
1import { Novu } from "@novu/node";
2
3// Insert your Novu API Key here
4const novu = new Novu("<NOVU_API_KEY>");
5
6// Create a subscriber on Novu
7await novu.subscribers.identify("132", {
8  email: "john.doe@domain.com",
9  firstName: "John",
10  lastName: "Doe",
11  phone: "+13603963366",
12});
For the sake of this article, we’ll make do with adding a subscriber via the terminal to speed the process up.
Set up Novu Notification Center in the Next.js app
Head over to scr/pages/index.js. We’ll modify this page to include the Novu Notification Center.
Import the Notification Center components from the Novu notification center package like so:
1...
2import {
3  NovuProvider,
4  PopoverNotificationCenter,
5  NotificationBell,
6} from "@novu/notification-center";
Display the Notification Center by adding the imported components like so:
1...
2return (
3 <main
4 className={`flex min-h-screen flex-col items-center justify-between p-24 ${inter.className}`}
5 >
6 <div className="z-10 max-w-5xl w-full items-center justify-between font-mono text-sm lg:flex">
7 <p className="fixed left-0 top-0 flex w-full justify-center border-b border-gray-300 bg-gradient-to-b from-zinc-200 pb-6 pt-8 backdrop-blur-2xl dark:border-neutral-800 dark:bg-zinc-800/30 dark:from-inherit lg:static lg:w-auto lg:rounded-xl lg:border lg:bg-gray-200 lg:p-4 lg:dark:bg-zinc-800/30">
8 Dev.to In-App Notifications
9 </p>
10 <div className="fixed bottom-0 left-0 flex h-48 w-full items-end justify-center bg-gradient-to-t from-white via-white dark:from-black dark:via-black lg:static lg:h-auto lg:w-auto lg:bg-none">
11 <NovuProvider
12 subscriberId={process.env.NEXT_PUBLIC_SUBSCRIBER_ID}
13 applicationIdentifier={process.env.NEXT_PUBLIC_NOVU_APP_ID}
14 >
15 <PopoverNotificationCenter>
16 {({ unseenCount }) => (
17 <NotificationBell unseenCount={unseenCount} />
18 )}
19 </PopoverNotificationCenter>
20 </NovuProvider>
21 </div>
22 </div>
23
24 ...
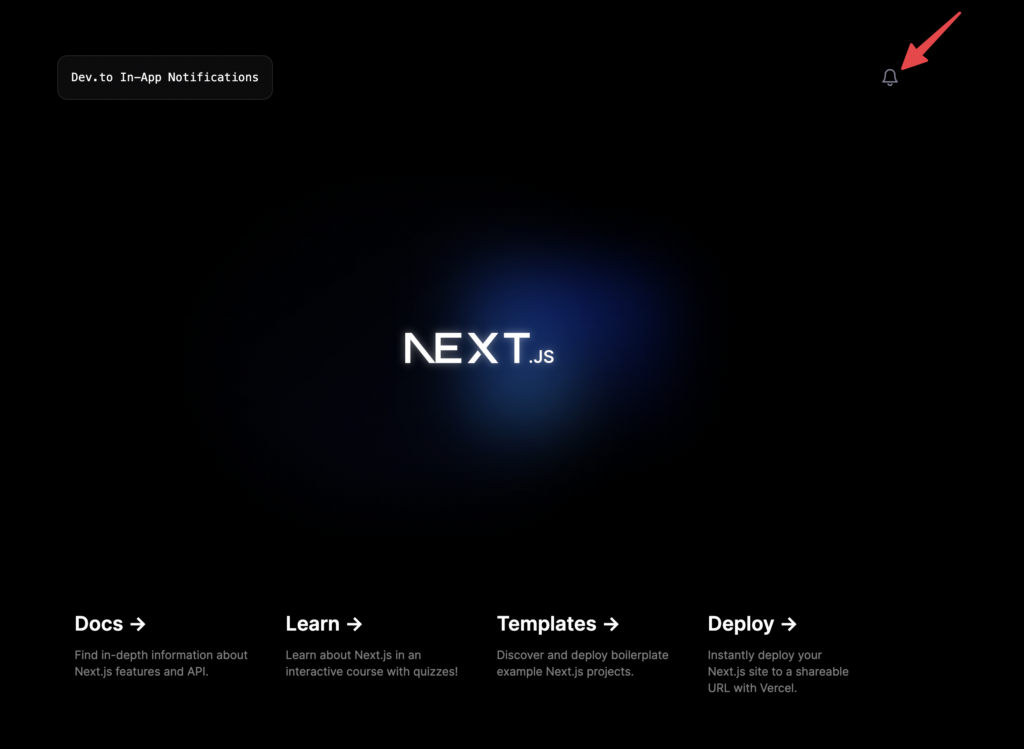
25 <div className="grid grid-cols-2">Check your app, you should immediately see a notification bell.
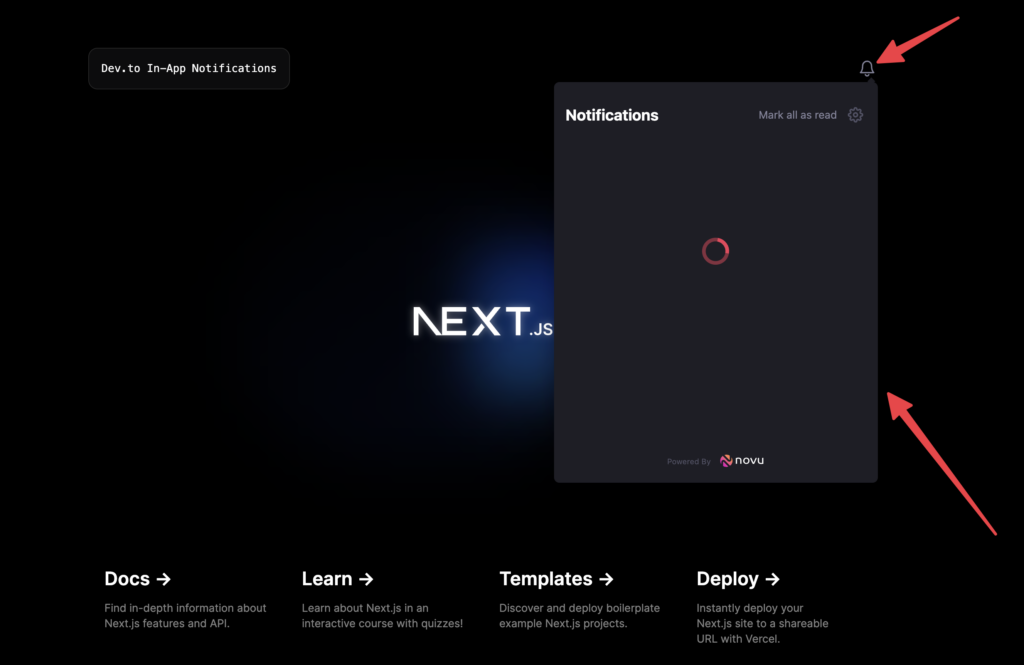
Click the notification bell. The Notification Center will immediately pop up like so:
Add the following to your .env values:
1NEXT_PUBLIC_SUBSCRIBER_ID=
2NEXT_PUBLIC_NOVU_APP_ID=
3NEXT_PUBLIC_NOVU_API_KEY=
Grab your Novu API Key and APP ID from the Settings section of your Novu dashboard.

Get the Identifier of the subscriber we created earlier and add it to the .env values.
In a real world app, the ID of the logged-in user should be passed to the subscriberID property of the NovuProvider component.
Note: We’re using it as an env variable because we’re not incorporating an authentication system in this tutorial. Ideally, once the user registers, the user ID should immediately be created as a subscriber and the ID be passed to the component.
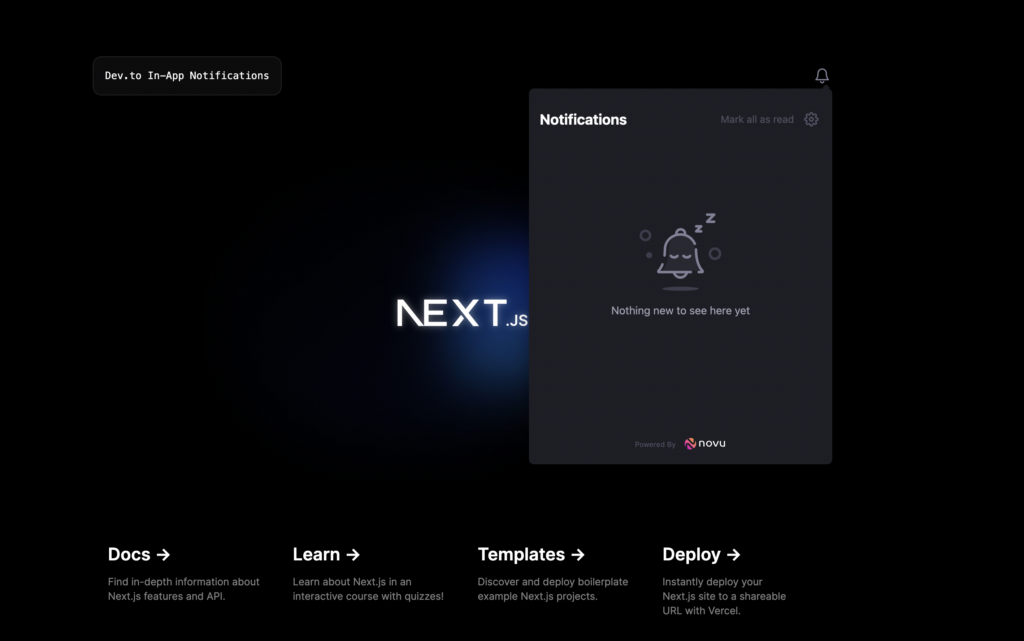
Reload your app and the notification center should be squeaky clean like so:
Build the API to publish dev.to articles and trigger In-App Notifications
Create a publish-devto-article.js file in the src/pages/api directory.
Add the code below to it to import the Novu SDK and specify the workflow trigger ID:
1import { Novu } from "@novu/node";
2
3const novu = new Novu(process.env.NEXT_PUBLIC_NOVU_API_KEY);
4
5export const workflowTriggerID = "devto-notifications";
Note: The @novu/node Novu SDK can be used only in server-side.
The workflowTriggerID value is obtained from the workflow dashboard. Earlier, when we set up a workflow titled Devto Notifications, Novu created a slug from this title to serve as the trigger ID.
You can see it here:

Now add the following functions to the code in the publish-devto-article.js file:
1...
2export default async function handler(req, res) {
3  const { article } = req.body;
4
5  const response = await fetch("<https://dev.to/api/articles>", {
6    method: "POST",
7    headers: {
8      "Content-Type": "application/json",
9      "API-Key": process.env.NEXT_PUBLIC_DEVTO_API_KEY,
10    },
11    body: JSON.stringify({ article: article }),
12  });
13
14  /**
15   * Get response of the published article from Dev.to
16   */
17  const dataFromDevto = await response.json();
18
19  /**
20   * Extra the essential details needed from the Dev.to response
21   */
22  const { title, url, published_timestamp, user } = dataFromDevto;
23
24  /**
25   * Send notification that a new article has been published
26   */
27  sendInAppNotification(user, title, url);
28
29  return res.json({ message: dataFromDevto  });
30}
31
32/**
33 * SEND IN-APP NOTIFICATION VIA NOVU
34 * @param {*} userDetails
35 * @param {*} articleTitle
36 * @param {*} articleURL
37 * @returns json
38 */
39async function sendInAppNotification(userDetails, articleTitle, articleURL) {
40  await novu.trigger(workflowTriggerID, {
41    to: {
42      subscriberId: process.env.NEXT_PUBLIC_SUBSCRIBER_ID,
43    },
44    payload: {
45      name: userDetails.name,
46      article_url: articleURL,
47      article_title: articleTitle,
48      profile_image: userDetails.profile_image_90,
49    },
50  });
51
52  return res.json({ finish: true });
53}
The sendInAppNotification function block of code above triggers the notification via the Novu SDK:
- Accepts the workflow trigger ID to determine which workflow to trigger.
- Accepts the subscriber ID value to identify the notification recipient.
- Accepts a payload object that represents the parameters to inject into the workflow variables.
The handler function block above makes a POST request to dev.to to publish an article and then calls the sendInAppNotification to fire an In-App notification indicating that someone just published an article.
Note: The request body is passed from POSTMAN or Insomnia. Next, we will test our API with any of these API software tools.
Test the API with POSTMAN or Insomnia – publish to dev.to
Fire up either POSTMAN or Insomnia and make a request to the API we created and post a JSON request to publish an article on dev.to.
Our API url: http://localhost:3000/api/publish-devto-article
I personally use and prefer Insomnia because it has a snappy and lovely UI. As you can see below, we passed some parameters (pulled from dev.to API docs) to enable our publishing an article.

Next, check your app. You should see an instant notification about the new published article on dev.to.

Click on the new post title. It should take you directly to the article on dev.to!

You can try publishing as many as possible.

The Notification Center provides a lot of functions built-in. A user can mark all notifications as read, mark one notification as read, and delete a notification.
The Notification Center ships with a lot of props and options to customize the whole experience. Header, footer, colors can be customized to conform with your app.
Center the Notification Center, just like on dev.to
You might be wondering, the dev.to Notification Center isn’t a popover; it’s centered on the page. How do I achieve that?
Simply replace the PopoverNotificationCenter component with the NotificationCenter component from the Novu package.
It should look something like this:
1<NovuProvider
2 subscriberId={process.env.NEXT_PUBLIC_SUBSCRIBER_ID}
3 applicationIdentifier={process.env.NEXT_PUBLIC_NOVU_APP_ID}
4>
5 <NotificationCenter />
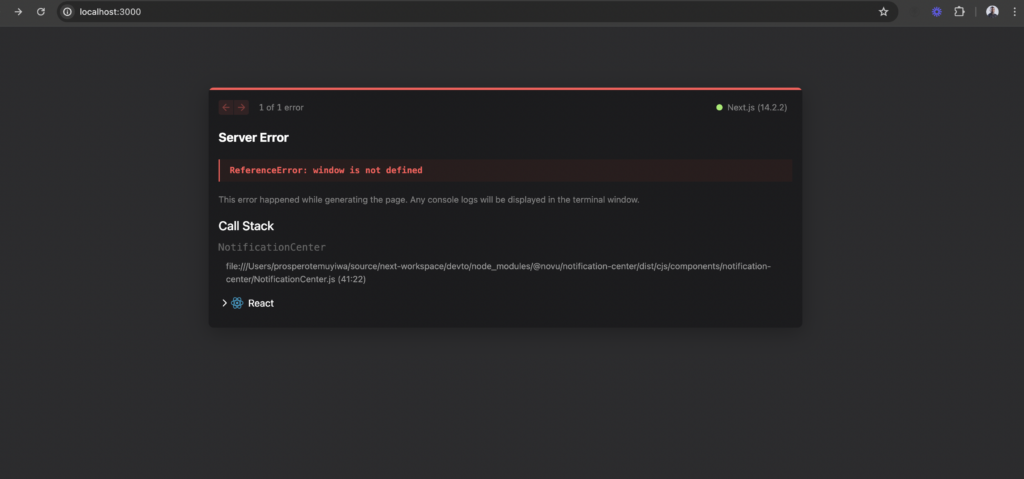
6</NovuProvider>However, Next.js uses Server side rendering so you might come across this issue on your page because the <NotificationCenter /> component makes use of the window object.
Let’s fix this issue by wrapping the component in a way that disables ssr and lazy loads it.
Create a components/notifications folder in the src/ directory. Go ahead and add these two files with the code below to them respectively:
index.js
1export { default } from "./notifications"; notifications.js
1import { NotificationCenter } from "@novu/notification-center";
2import dynamic from "next/dynamic";
3import React, { useCallback } from "react";
4
5const Notifications = () => {
6  const onNotificationClick = useCallback((notification) => {
7    if (notification?.cta?.data?.url) {
8      window.location.href = notification.cta.data.url;
9    }
10  }, []);
11
12  return (
13    <div>
14      <NotificationCenter
15        colorScheme="dark"
16        onNotificationClick={onNotificationClick}
17      />
18    </div>
19  );
20};
21
22export default dynamic(() => Promise.resolve(Notifications), {
23  ssr: false,
24});
The code above does the following:
- It imports the original
<NotificationCenter />component from Novu. - It uses Next’s dynamic functionality that allows us to dynamically load a component on the client side, and to use the
ssroption to disable server-rendering. - It defines a notificationClick handler for the onNotificationClick prop of the NotificationCenter component (The function that is called when the notification item is clicked).
- The
colorSchemeis one of the props you can pass to the NotificationCenter component. It takes in either “light” or “dark” values to enable you set the UI mode.
Finally, head back to the pages/index.js file, import our newly created component and use it in the NovuProvider parent component like so:
1...
2import Notification from "../components/notifications";
3
4...
5...
6...
7<div className="fixed bottom-0 left-0 flex h-48 w-full items-end justify-center bg-gradient-to-t from-white via-white dark:from-black dark:via-black lg:static lg:h-auto lg:w-auto lg:bg-none">
8    <NovuProvider
9      subscriberId={process.env.NEXT_PUBLIC_SUBSCRIBER_ID}
10      applicationIdentifier={process.env.NEXT_PUBLIC_NOVU_APP_ID}
11    >
12      <Notification />
13    </NovuProvider>
14</div>
15...
16...
17...
Lastly, let’s adjust the components’ position to place the Notification Center in the middle of the page.
pages/index.js
1import Image from "next/image";
2import { Inter } from "next/font/google";
3import {
4  NovuProvider,
5  PopoverNotificationCenter,
6  NotificationBell,
7} from "@novu/notification-center";
8
9import Notification from "../components/notifications";
10
11const inter = Inter({ subsets: ["latin"] });
12
13export default function Home() {
14  return (
15    <main
16      className={`flex min-h-screen flex-col items-center justify-between p-24 ${inter.className}`}
17    >
18      <div className="z-10 max-w-5xl w-full items-center justify-between font-mono text-sm lg:flex">
19        <p className="fixed left-0 top-0 flex w-full justify-center border-b border-gray-300 bg-gradient-to-b from-zinc-200 pb-6 pt-8 backdrop-blur-2xl dark:border-neutral-800 dark:bg-zinc-800/30 dark:from-inherit lg:static lg:w-auto lg:rounded-xl lg:border lg:bg-gray-200 lg:p-4 lg:dark:bg-zinc-800/30">
20          Dev.to In-App Notifications
21        </p>
22      </div>
23
24      <div className="relative flex place-items-center before:absolute before:h-[300px] before:w-full sm:before:w-[480px] before:-translate-x-1/2 before:rounded-full before:bg-gradient-radial before:from-white before:to-transparent before:blur-2xl before:content-[''] after:absolute after:-z-20 after:h-[180px] after:w-full sm:after:w-[240px] after:translate-x-1/3 after:bg-gradient-conic after:from-sky-200 after:via-blue-200 after:blur-2xl after:content-[''] before:dark:bg-gradient-to-br before:dark:from-transparent before:dark:to-blue-700/10 after:dark:from-sky-900 after:dark:via-[#0141ff]/40 before:lg:h-[360px]">
25        <NovuProvider
26          subscriberId={process.env.NEXT_PUBLIC_SUBSCRIBER_ID}
27          applicationIdentifier={process.env.NEXT_PUBLIC_NOVU_APP_ID}
28        >
29          <Notification />
30        </NovuProvider>
31      </div>
32
33      <div className="mb-32 grid text-center lg:max-w-5xl lg:w-full lg:mb-0 lg:grid-cols-4 lg:text-left">
34        <a
35          href="<https://nextjs.org/docs?utm_source=create-next-app&utm_medium=default-template-tw&utm_campaign=create-next-app>"
36          className="group rounded-lg border border-transparent px-5 py-4 transition-colors hover:border-gray-300 hover:bg-gray-100 hover:dark:border-neutral-700 hover:dark:bg-neutral-800/30"
37          target="_blank"
38          rel="noopener noreferrer"
39        >
40          <h2 className={`mb-3 text-2xl font-semibold`}>
41            Docs{" "}
42            <span className="inline-block transition-transform group-hover:translate-x-1 motion-reduce:transform-none">
43              ->
44            </span>
45          </h2>
46          <p className={`m-0 max-w-[30ch] text-sm opacity-50`}>
47            Find in-depth information about Next.js features and API.
48          </p>
49        </a>
50
51        <a
52          href="<https://nextjs.org/learn?utm_source=create-next-app&utm_medium=default-template-tw&utm_campaign=create-next-app>"
53          className="group rounded-lg border border-transparent px-5 py-4 transition-colors hover:border-gray-300 hover:bg-gray-100 hover:dark:border-neutral-700 hover:dark:bg-neutral-800/30"
54          target="_blank"
55          rel="noopener noreferrer"
56        >
57          <h2 className={`mb-3 text-2xl font-semibold`}>
58            Learn{" "}
59            <span className="inline-block transition-transform group-hover:translate-x-1 motion-reduce:transform-none">
60              ->
61            </span>
62          </h2>
63          <p className={`m-0 max-w-[30ch] text-sm opacity-50`}>
64            Learn about Next.js in an interactive course with quizzes!
65          </p>
66        </a>
67
68        <a
69          href="<https://vercel.com/templates?framework=next.js&utm_source=create-next-app&utm_medium=default-template-tw&utm_campaign=create-next-app>"
70          className="group rounded-lg border border-transparent px-5 py-4 transition-colors hover:border-gray-300 hover:bg-gray-100 hover:dark:border-neutral-700 hover:dark:bg-neutral-800/30"
71          target="_blank"
72          rel="noopener noreferrer"
73        >
74          <h2 className={`mb-3 text-2xl font-semibold`}>
75            Templates{" "}
76            <span className="inline-block transition-transform group-hover:translate-x-1 motion-reduce:transform-none">
77              ->
78            </span>
79          </h2>
80          <p className={`m-0 max-w-[30ch] text-sm opacity-50`}>
81            Discover and deploy boilerplate example Next.js projects.
82          </p>
83        </a>
84
85        <a
86          href="<https://vercel.com/new?utm_source=create-next-app&utm_medium=default-template-tw&utm_campaign=create-next-app>"
87          className="group rounded-lg border border-transparent px-5 py-4 transition-colors hover:border-gray-300 hover:bg-gray-100 hover:dark:border-neutral-700 hover:dark:bg-neutral-800/30"
88          target="_blank"
89          rel="noopener noreferrer"
90        >
91          <h2 className={`mb-3 text-2xl font-semibold`}>
92            Deploy{" "}
93            <span className="inline-block transition-transform group-hover:translate-x-1 motion-reduce:transform-none">
94              ->
95            </span>
96          </h2>
97          <p className={`m-0 max-w-[30ch] text-sm opacity-50 text-balance`}>
98            Instantly deploy your Next.js site to a shareable URL with Vercel.
99          </p>
100        </a>
101      </div>
102    </main>
103  );
104}
Note: Ensure this is the full code of the pages/index.js file to avoid missing anything.
Now, reload your app. It should resemble dev.to’s centered Notification page. Yaayyyy!!

Publish a new article on dev.to and observe how the notifications arrive via the centralized Notifications component, even without a notification bell. The Notification unseen counter shows right there.

Go one step further, make the background light mode and change the Notification Center to light mode.

Up next: build dev.to email community digest
You’ve learned how to develop an In-App Notification System in under 30 minutes. Over time, I’ve learned that the best developers use battle-tested tools to build their apps and systems.
Fortunately, there’s more. I have additional tips to share with you. 😉
Next, I’ll demonstrate how to use Novu to build an Email Community Digest, similar to the excellent digest from dev.to, which keeps us updated on the top published articles.

Stay tuned for the next part of this article! Don’t hesitate to ask any questions or request support. You can find me on Discord and Twitter. Please feel free to reach out.


