Just a quick background about us. Novu is the first open-source notification infrastructure. We basically help to manage all the product notifications. It can be In-App (the bell icon like you have in the Dev Community – Websockets), Emails, SMSs, etc.
I would be super happy if you could give us a star! It will help me to make more articles every week 🚀 https://github.com/novuhq/novu
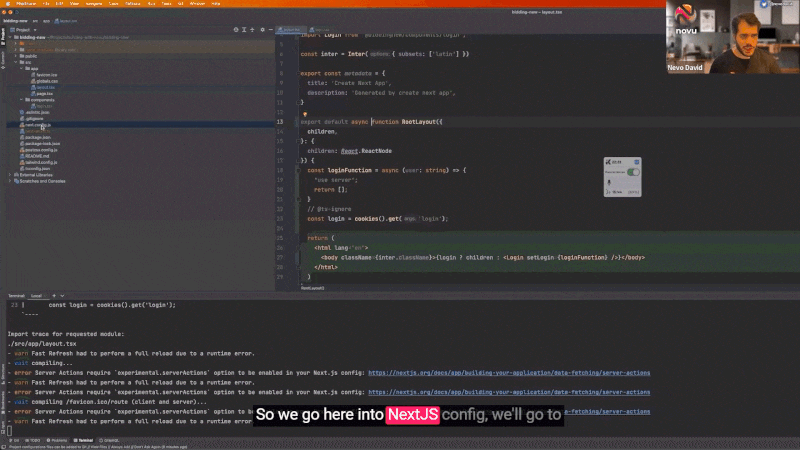
We will start the project by initiating a new NextJS project:
npx create-next-app@latest
And mark the following details
\u2714 What is your project named? \u2026 new-proj\u2714 Would you like to use TypeScript with this project? \u2026 No / Yes\u2714 Would you like to use ESLint with this project? \u2026 No / Yes\u2714 Would you like to use Tailwind CSS with this project? \u2026 No / Yes\u2714 Would you like to use `src/` directory with this project? \u2026 No / Yes\u2714 Use App Router (recommended)? \u2026 No / Yes\u2714 Would you like to customize the default import alias? \u2026 No / Yes
We are adding the ability to use the server actions as it’s currently still in the beta stage. This will allow us to call the server directly from the client 💥
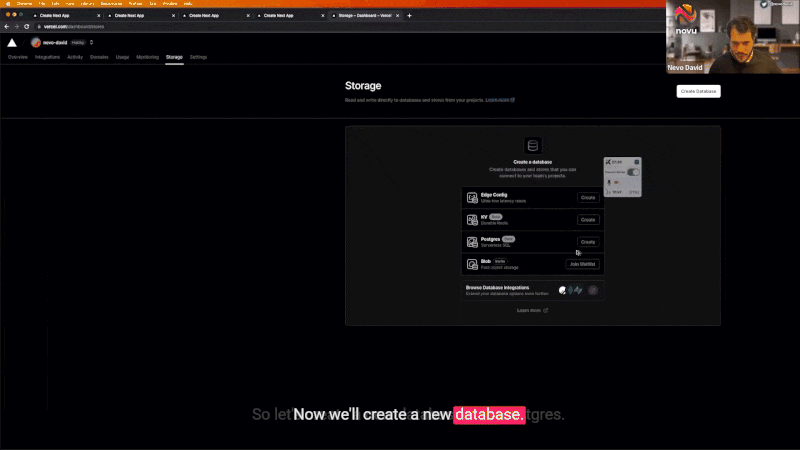
For our project, we are going to use Postgres. Feel free to host it yourself (use docker), neon.tech, supabase, or equivalent. For our example, we will use Vercel Postgres.
You can start by going to Vercel Storage area and creating a new database.
We will start by adding our bid table. It will contain the product’s name, the product, the owner of the product, and the current amount of bids.
Click on the query tab and run the following query
create table bids( id SERIAL PRIMARY KEY, name varchar(255), owner varchar(255), total_bids int default 0 not null);
Click on “.env.local” tab, and copy everything.
Open a new file in our project named .env and paste everything inside.
We are using "use client", which means this component will run over the client. As a result, you can see that we have the "useState" available to us. To clarify, you can use client components inside server components but not vice versa.
We have added a requirement for a parameter called setLogin it means once somebody clicks on the submit function, it will trigger the login function.
Let’s build the setLogin over the main layout page.This is where the magic happens 🪄✨We will create a function using the new Next.JS server-actions method.The method will be written in the client. However, it will run over the server.In the background, Next.JS actually sends an HTTP request.
As you can see, there is a new function called loginFunction, and at the start, there is a “use server” This tells the function to run over the server. It will get the user name from the setLogin and set a new cookie called “login”.
Once done, the function will re-render, and we will see the rest of the routes.
We use SQL here directly from the client 🤯 You can also see that the SQL function takes care of any XSS or SQL injections (I haven’t used any bindings).
We insert into the database a new product. You can see that we use the “owner” by using the name saved in the cookie. We also set the bidding to 0.
In the end, we must tell the app to revalidate the path. If not, we will not see the new product.
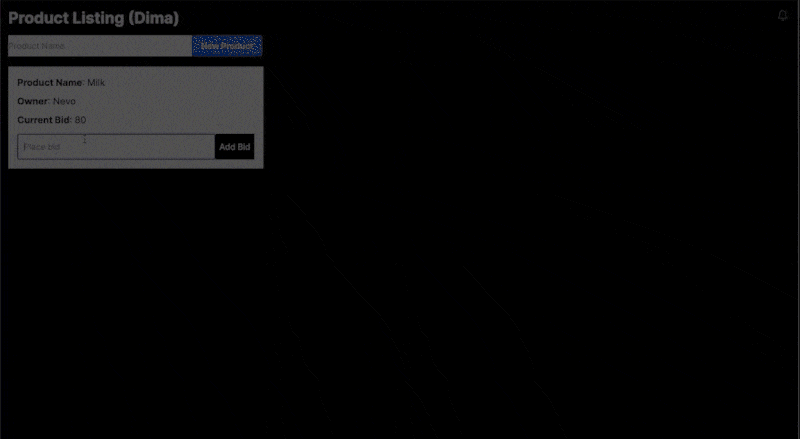
The final page will look like this:
import { sql } from "@vercel/postgres";import { cookies } from "next/headers";import { NewProduct } from "@biddingnew/components/new.product";import { revalidatePath } from "next/cache";export default async function Home() { const addProduct = async (product: string) => { "use server"; const login = cookies().get("login"); const { rows } = await sql`INSERT INTO bids (name, owner, total_bids) VALUES(${product}, ${login?.value!}, 0) RETURNING id`; revalidatePath("/"); }; const { rows } = await sql`SELECT * FROM bids ORDER BY id DESC`; const login = cookies().get("login"); return ( Product Listing ({login?.value!}) </h1> </div> {rows.map((product) => ( Product Name</strong>: {product.name} </div> Owner</strong>: {product.owner} </div> Current Bid</strong>: {product.total_bids} </div> </div> ))} </div> </div> );}
Now let’s create a new component for adding a bid to a product.
Create a new file called bid.input.tsx and add the following code:
The component is almost the same as the product component.The only difference is that it also gets an ID parameter of the current product to tell the server which bid to update.
The component is pretty simple. Just ensure you update the application identifier with the one you have on the Novu dashboard. You can find the full reference of the notification component over Novu Documentation.
As for the subscriberId, it can be anything that you choose. For our case, we use the name from the cookie, so each time we send a notification, we will send it to the name from the cookie.
This is not a safe method, and you should send an encrypted id in the future. But it’s ok for the example 🙂
Now let’s add it to our code.
The full-page code should look something like this:
import Image from "next/image";import { sql } from "@vercel/postgres";import { cookies } from "next/headers";import { NovuComponent } from "@biddingnew/components/novu.component";import { NewProduct } from "@biddingnew/components/new.product";import { revalidatePath } from "next/cache";import { BidInput } from "@biddingnew/components/bid.input";export default async function Home() { const addBid = async (id: number, bid: number) => { "use server"; const login = cookies().get("login"); await sql`UPDATE bids SET total_bids = total_bids + ${bid} WHERE id = ${id}`; const { rows } = await sql`SELECT * FROM bids WHERE id = ${id}`; revalidatePath("/"); }; const addProduct = async (product: string) => { "use server"; const login = cookies().get("login"); const { rows } = await sql`INSERT INTO bids (name, owner, total_bids) VALUES(${product}, ${login?.value!}, 0) RETURNING id`; revalidatePath("/"); }; const { rows } = await sql`SELECT * FROM bids ORDER BY id DESC`; const login = cookies().get("login"); return ( Product Listing ({login?.value!}) </h1> </div> </div> {rows.map((product) => ( Product Name</strong>: {product.name} </div> Owner</strong>: {product.owner} </div> Current Bid</strong>: {product.total_bids} </div> </div> </div> ))} </div> </div> );}
We can see the Novu notification bell icon, however, we are not sending any notifications yet.
So let’s do it!
Every time somebody creates a new product, we will create a new topic for it.
Then on each notification to the same product, we will register subscribers to it.
Let’s take an example:
The host creates a new product – a topic is created.
User 1 adds a new bid, registers himself to the topic, and sends everybody registered to the topic that there is a new bid (currently, nobody is registered).
User 2 adds a new bid, registers himself to the topic, and sends everybody registered to the topic that there is a new bid (User 1 gets a notification).
User 3 adds a new bid, registers himself to the topic, and sends everybody registered to the topic that there is a new bid (User 1 gets a notification, and User 2 gets a notification).
User 1 adds a new bid (to the same topic) and sends everybody registered to the topic that there is a new bid (User 2 gets a notification, and User 3 gets a notification).
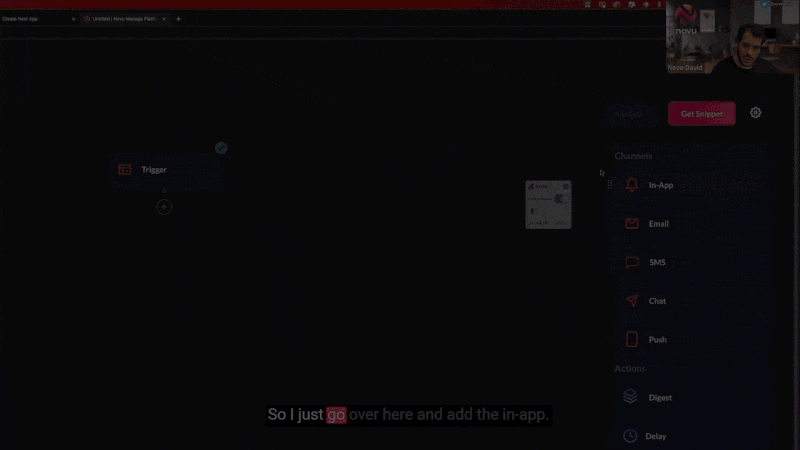
Now let’s go over to the Novu dashboard and add a new template
Let’s create a new template and call it “New bid in the system.” let’s drag a new “In-App” channel and add the following content:
{{name}} just added a bid of {{bid}}
Once done, enter the Settings page, move to the API Keys tab, and copy the API KEY.
Let’s add Novu to our project:
npm install @novu/node
And let’s add it to the top of our file and change the API_KEY with our API KEY from the Novu dashboard:
import { Novu } from "@novu/node";const novu = new Novu("API_KEY");
Now, when the host creates a new product, let’s create a new topic, so let’s modify our addProduct Function to look like this:
We have added a new novu.topics.create function, which creates a new topic.
The topic key must be unique.
We used the created ID of the bid to create the topic.
The name is anything that you want to understand what it is in the future.
So we have created a new topic. On a new bid, the only thing left is to register the user to the topic and notify everybody about it. Let’s modify addBid and add the new logic:
As you can see, we use novu.topics.addSubscribers to add the new user to the topic.
And then, we trigger the notification to the topic with novu.trigger to notify everybody about the new bid.
We also have the actor parameter, since we are already registered to the topic, we don’t want to send a notification to ourselves. We can pass our identifier to the actor parameter to avoid that.
Only one thing is missing.
The host is clueless about what’s going on.
The host is not registered to the topic and not getting any notifications.
We should send the host a notification on any bid.
So let’s create a new template for that.
Now let’s go over to the Novu dashboard and add a new template
Let’s create a new template and call it “Host bid” Let’s drag a new “In-App” channel and add the following content:
Congratulation!! {{name}} just added a bid of {{bid}}
Now the only thing left is to call the trigger every time to ensure the host gets the notification. Here is the new code of addBid
The ConnectNovu Hackathon is live 🤩This is your time to showcase your skills, meet new team members and grab awesome prizes.
If you love notifications, this Hackathon is for you.You can create any system that requires notifications using Novu.SMS, Emails, In-App, Push, anything you choose.We have also prepared a list of 100 topics you can choose from – just in case you don’t know what to do.
ConnectNovu
Some fantastic prizes are waiting for you:Such as GitHub sponsorships of $1500, Novu’s Swag, Pluralsight subscription, and excellent Novu benefits.